How to get off Auto Mode on your SLR Camera
How to get off Auto Mode on your SLR Camera
Posted on
Hi everyone!
Adam’s camera Olivia here again with some more tips to help you take better photos when out enjoying the great outdoors.
Last time we talked about how composition is the most important factor when you want go from taking photos that are just ok, to taking photos that will make the viewer go ‘WOW’!!!
This time I want to tell you more about how I work as a camera, and how you can use that knowledge to take even more impressive looking photos. Once you know more about how I work, you will be able to take your own camera off Auto Mode, be much more creative with your photography and get some truly stunning shots!
Exposure:
When we talk about “exposure”, we simply mean how bright or how dark a photo is. Exposure has 3 parameters that will determine it it’s too dark, too bright or spot on. These 3 parameters are Aperture, Shutter speed, and ISO and how you combine them will not only determine if your image is correctly exposed, but also influence other factors like depth of field (how much of the photo is in focus), motion blur (if moving objects appear sharp or blurry) and image noise (how grainy a photo looks).
When you take a photo in Auto Mode, we cameras makes the decisions about the settings of these 3 parameters. We don’t really like this because we aren’t very creative so we usually choose boring settings that take boring photos. When you switch Auto off though, you as the photographer choose these settings, creating the look of the photo that you desire. We much prefer this because photographers are much more creative than cameras, and can create much more interesting photos.
Here’s what these parameters actually mean.
Aperture:
Simply put, aperture is the hole within a lens, through which light travels into the camera body. You as the photographer can choose how large that hole opens (the aperture) when you take a photo, thus changing the amount of light that reaches your camera’s sensor. The diagram below shows how different aperture values effect how much the hole opens and how it will effect your photo.
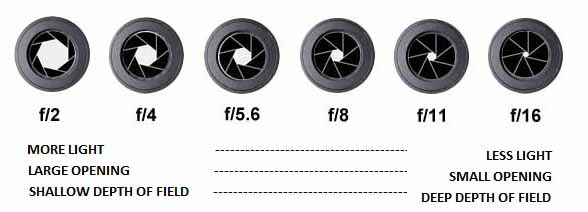
You’ll notice that in order to confuse you, the larger the number of the F Stop (Aperture Value), the smaller the aperture (smaller hole, less light).
Effects of Aperture:
Exposure
Aperture effects the look of your photographs in a couple of ways. One is that it effects the brightness, or exposure, of your images. The larger the aperture (bigger hole), the more light will reach the sensor resulting in a brighter photograph. A small aperture does just the opposite, making a photo darker.
Depth of Field
The other major influence that aperture has on your photo is the Depth of Field. This is the amount of your photograph that appears sharp from front to back. Some images have a “shallow” depth of field, where the background is completely out of focus. Other images have a “large” or “deep” depth of field, where both the foreground and background are sharp.
Aperture is the most important factor when deciding how much depth of field you want in your photo. This is where you as the super creative photographer can create some really cool effects that take your photo to the “WOW” level!
The way it works is that the larger aperture you choose (lower F number, bigger opening of the hole), the less of the photo will be in focus (shallow depth of field). This is where you can get those nice blurry backgrounds which helps to isolate your subject as shown below. These were both shot at F1.8.
Sometimes though, you really want as much of the photo as possible to be in focus (landscapes). In these cases you want a large depth of field so the whole photo is sharp. To achieve this you need to select a smaller aperture (larger F number, smaller opening of the hole). See the examples below.
Now not all lenses have the ability to produce wide ranges of depth of field. For the most part, all lenses/camera phones can produce large depth of field without a problem because they are capable of low aperture values (small opening of the hole). Only certain lenses however can produce shallow depth of field, as not all lenses can produce very high aperture values (large opening of the hole) i.e F1.8, 2.0. Lenses that are capable of high aperture values are typically more expensive but really can be the difference when trying to get a “WOW” look to your photos.
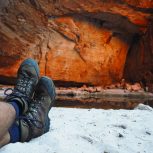
To create really shallow depth of field, you also need a camera with a large sensor. I won’t go into the detail of why that is but basically if you have a DSLR, a Mirrorless Camera or even some of the more expensive compact cameras, you should be able to create shallow depth of field. Mobile phones can’t do this because they have a very, very small sensor (however you will probably notice with some of the newer mobiles they are able to simulate the effect) so if you want to progress with your photography, you really need a REAL CAMERA like me!
So now that you know about how aperture affects the look of you photos, let’s now talk about shutter speed.
Shutter Speed:
Shutter speed, also known as “exposure time”, is the length of time a camera’s shutter is open to expose light into the camera sensor. This will affect your exposure because if your shutter speed is too fast, not enough light will reach the sensor and your photo will be under exposed (too dark), if it’s too slow then too much light may reach your sensor and your photo will be over exposed (too bright).
The values of shutter speed are represented in time and usually appear as a fraction of a second i.e. 1/50, 1/250, 1/1000 etc. Shutter speeds can also go for multiple seconds when used for night time shots, or to exaggerate subject movement. This is called long exposure and requires a tripod.
Choosing which shutter speed to use will depend on which Aperture value you have chosen (how big the hole will open), the amount of light available (is it bright outside or are you in a dark environment), and if there are moving subjects, whether you want to freeze them or make them blurry.
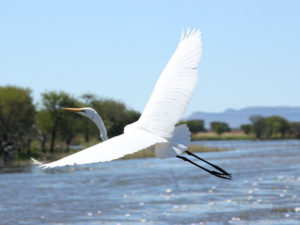
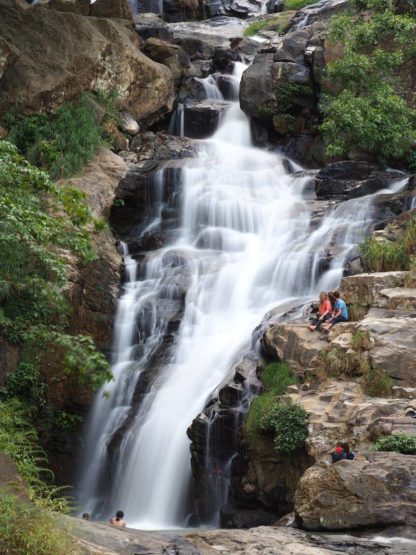
If the shutter speed is fast, it can help to freeze moving subjects completely (great for wildlife, especially birds). If the shutter speed is slow, it can create an effect called “motion blur”, where moving objects appear blurred (great for creating cool blurry effects on things like waterfalls).
The shots below show examples of catching a bird in flight with a fast shutter speed, and blurring the water of a waterfall with a slow shutter speed.
You need to be careful with slow shutter speeds though, as they can cause problems with unwanted blur in photos. This is because the longer the shutter stays open, the more steady you have to hold the camera, otherwise your photo will be blurry from the camera moving (camera shake). Sometimes there is just not enough light available to allow for a fast enough shutter speed to create a steady photo without camera shake. In this case, changing the ISO can help you get the shot you are after.
ISO:
The last of the 3 parameters that affects the exposure of your photo is ISO. This is basically how sensitive your camera is to the light. Setting a low ISO value will make it less sensitive whereas a high value will make it more sensitive.
Most cameras start at a base ISO of 100 and can go up to as much as 32,000 or even higher.
The main effect that ISO will have on your photo is how much noise will appear. Noise is basically how much grain is visible in your photo. When you select a higher ISO value, your photo will become much more noisy and not look as nice. Some cameras handle noise better than others, so it’s best to play around with yours to see what ISO values you are happy to shoot with before the noise gets too much for your taste. Adam doesn’t like to shoot at an ISO above 1600 with me as beyond that, the photos look too noisy for him (he is very fussy though!)
If there is lots of light available (bright sunny day) you want to choose the lowest ISO value possible. When the available light is not so good (indoors, in a gorge, night time) you want to choose a higher ISO value so your camera is more sensitive to the light, which means you’ll be able to shoot at a shutter speed that will avoid camera shake.
The general rule is to set the lowest possible ISO value that will allow you to get the right exposure, and avoid camera shake. Remember you also have the Aperture and Shutter Speed to play with to help get the amount of light you need to correctly expose the photo.
The best modes for getting off Auto!
You now know the 3 parameters that affect how bright or dark your photo will be and also what other effects they have on the look of your photo, but I’m sure you’re thinking ‘how do I know which values to choose without stuffing up the photo?’
We cameras make it pretty easy for photographers to get away from using Auto mode by having settings that allow you to pick just one of the 3 parameters to change while we pick the rest.
Adam’s favourite mode to use is called Aperture Priority. This lets him choose the Aperture, while I decide the shutter speed and ISO so the exposure is correct. It’s kind of like a semi-automatic mode that allows you to be creative with your depth of field without having to worry about the exposure too much.
If he wants a shallow depth of field (a blurry background) in his shots, he’ll set the Aperture as large as he can, depending on which lens he is using, and I’ll decide which shutter speed and ISO to use so the photo is not too dark or too bright. We make a great team this way 🙂
Sometimes though, he wants to choose the shutter speed when shooting moving subjects like birds so in these cases, he chooses Shutter Priority mode. In this mode, Adam chooses a fast shutter speed to freeze the birds in motion, and I pick the Aperture and ISO so the shot is exposed correctly.
Occasionally, Adam doesn’t like the ISO value that I pick in these modes because I’m quite conservative and pick a high value to make sure my sensor is sensitive enough to avoid camera shake. This creates more noise than he likes in his photos so he will choose the ISO value and rely on his steady hands to get a shot with out any blurriness from camera shake. He can do this in either Aperture Priority or Shutter Priority mode but simply turning off Auto ISO and selecting it himself.
Very very occasionally, Adam wants full control over his photo and doesn’t want me to make any decisions relating to the exposure. When this is the case, he chooses Manual mode which means he picks Aperture, Shutter Speed and ISO. It usually takes him a while to get the combination right, so he only really uses this mode when he has time to think about his shot without the pressure of 13 lovely guests trailing behind him on a tour 🙂
Read the Manual!!!
One more piece of advice before you run off to your own camera to try these things out, READ THE MANUAL! We cameras are quite complex creatures so it’s best to get to know us better by reading the manual that comes with us when you buy one. We are all a bit different and reading your camera’s manual will show you how to choose the settings that I’ve talked about in this blog. If only all relationships could be better understood by following a manual…. 😉
So there you have it, you now know a little bit more about how a camera like me works and what factors affect the look of your photos. With this knowledge I hope that next time you are out on one of the many wonderful walks in the world, you’ll turn your camera off Auto mode and play around with these settings to see how you can take control of your photography.
Happy snapping!
Olivia (and Adam)